My Store
301cc Big Bore Piston & Cylinder Set
Couldn't load pickup availability
Originally developed for my racing endeavors on a CBR300R, this kit has dozens of race wins, two class championships, and one lap record to its credit. With tens of thousands street and off-road miles logged, this is a proven and reliable setup for improving your CRF's performance, capability, and fun factor.
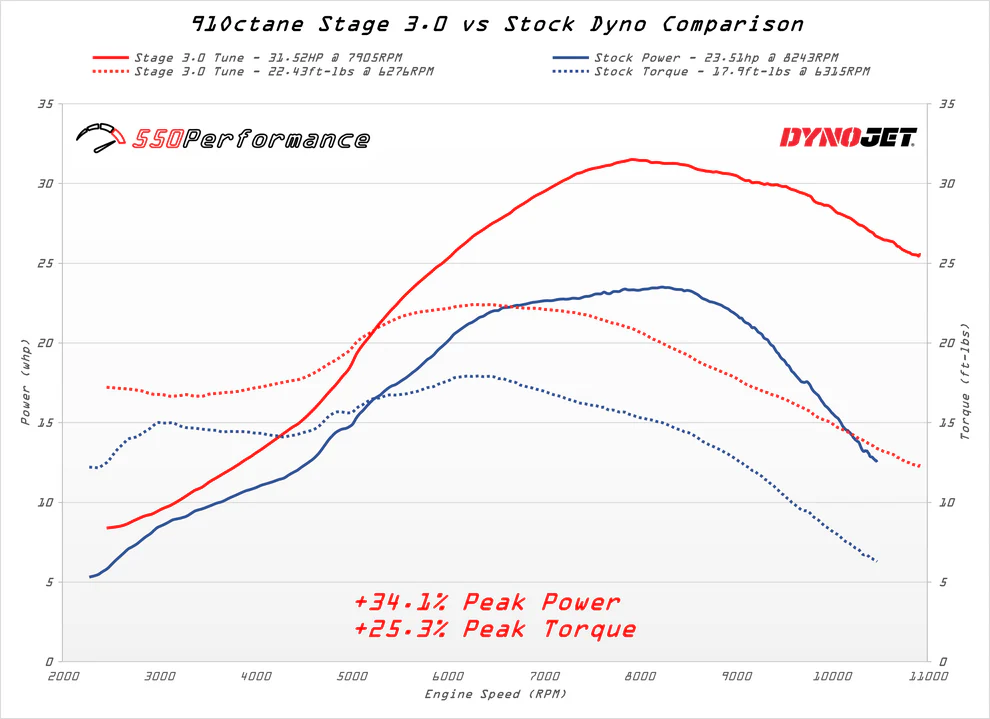
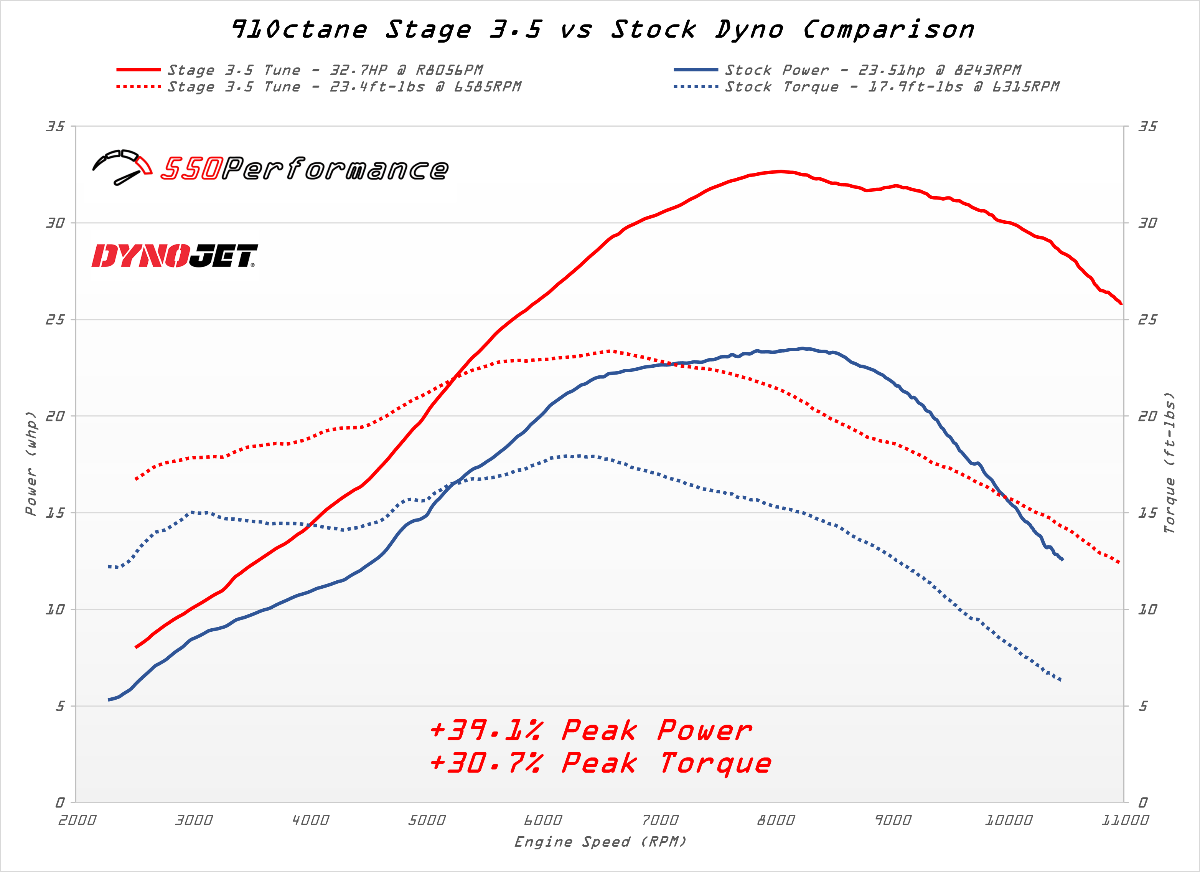
This piston and cylinder set turns your CRF300L into a true 300 with an additional 14.8cc while also increasing compression from the stock 10.7:1 to 11.5:1. When combined with the required Stage 3.0 parts which include a high-flow air filter, hi-flow velocity stack, CBR cams, performance exhaust, and Stage 3.0 ECU tune, you get a massive increase in torque (+25%) and horsepower (+34%). Throw on a CNC ported cylinder head and Stage 3.5 ECU tune for even more gains (+30% torque and +39% horsepower).
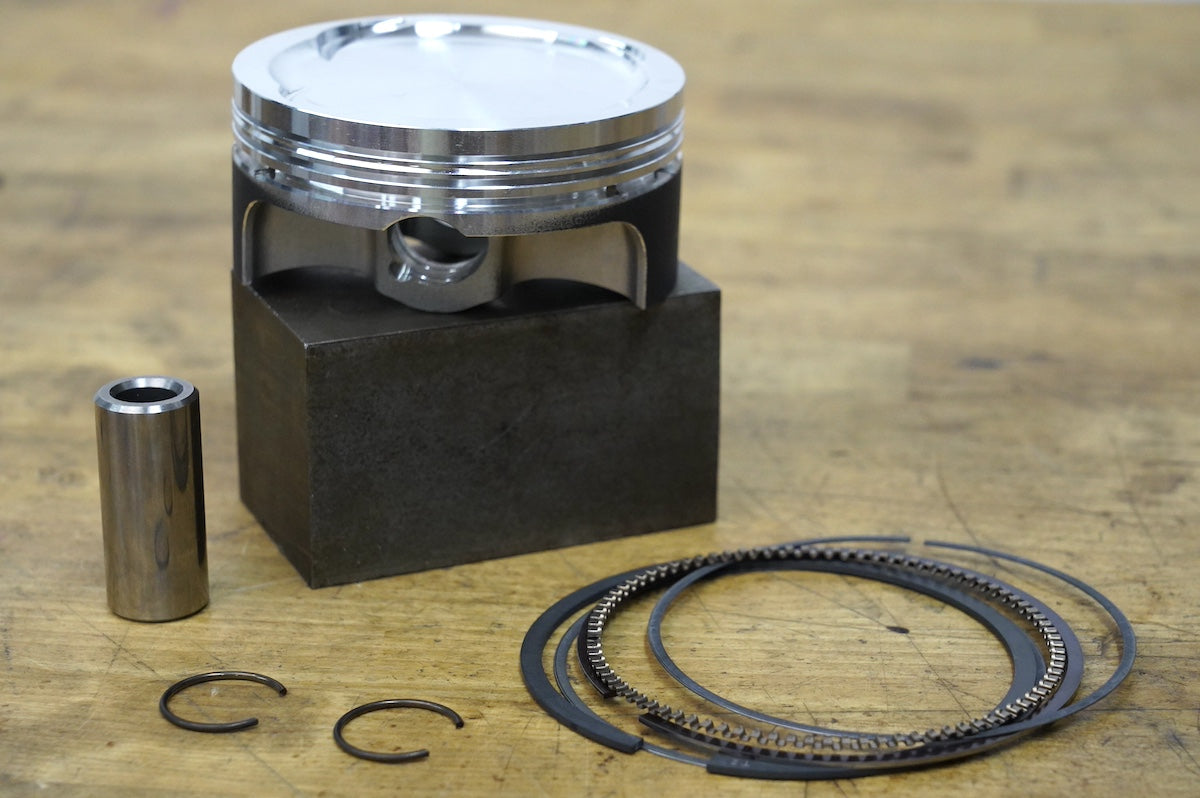
To ease installation, we now pre-set ring gap, install and orient the rings on the piston, install the right (cam-chain side) wrist-pin circlip, lubricate the piston and cylinder, and then slot the piston into the cylinder. This greatly reduces the work required for installation; just drop the whole assembly onto the con-rod, install the left circlip, and press the cylinder down.
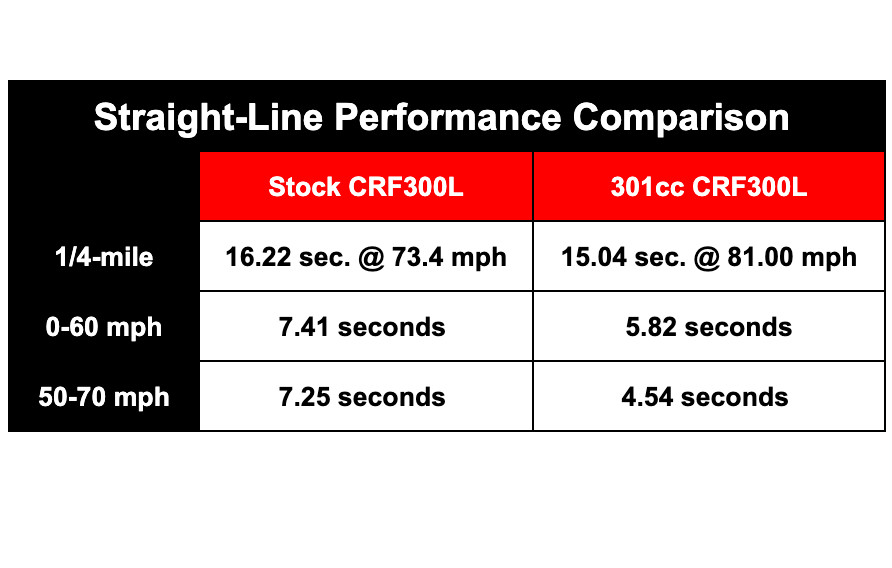
With our 301cc piston kit and full Stage 3.0 parts package you can expect faster acceleration, snappier throttle response, and easier highway cruising. See dyno charts and performance comparison below.
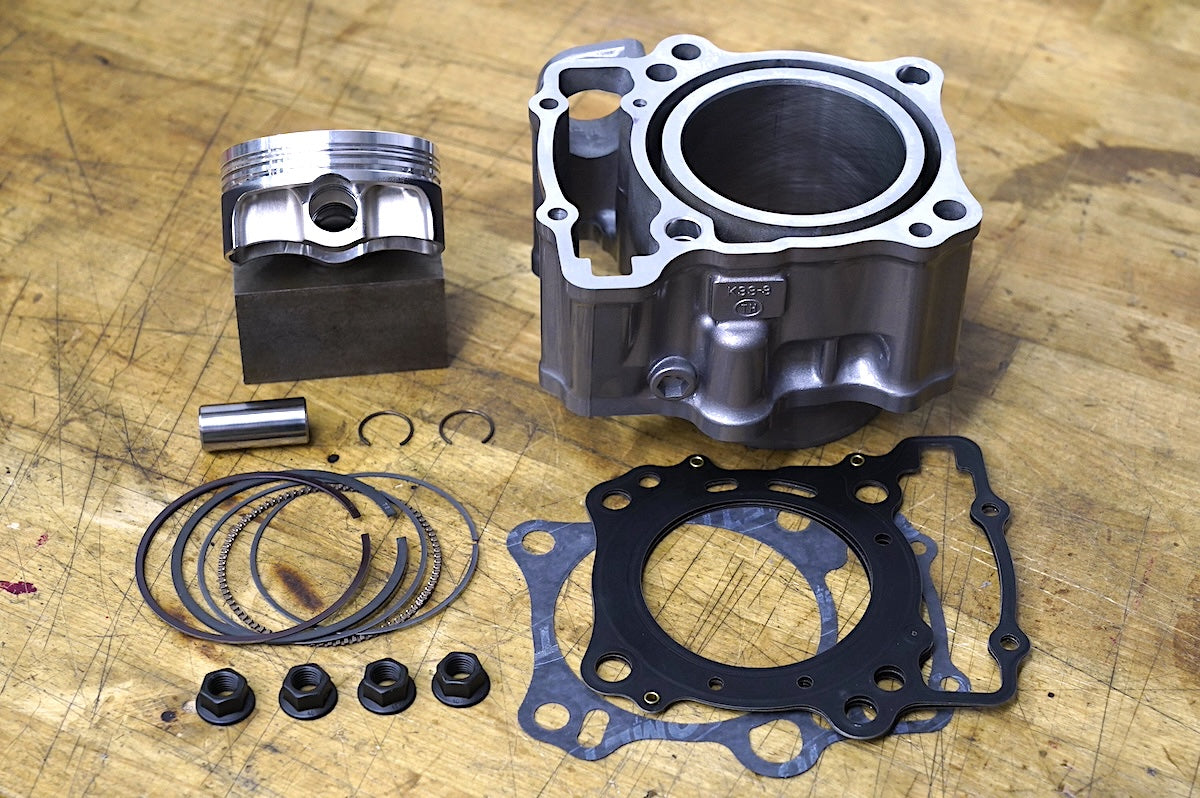
This piston and cylinder kit includes:
- Forged 78mm piston, 11.5:1 compression ratio
- Piston ring set, properly gapped
- Wrist pin and circlips
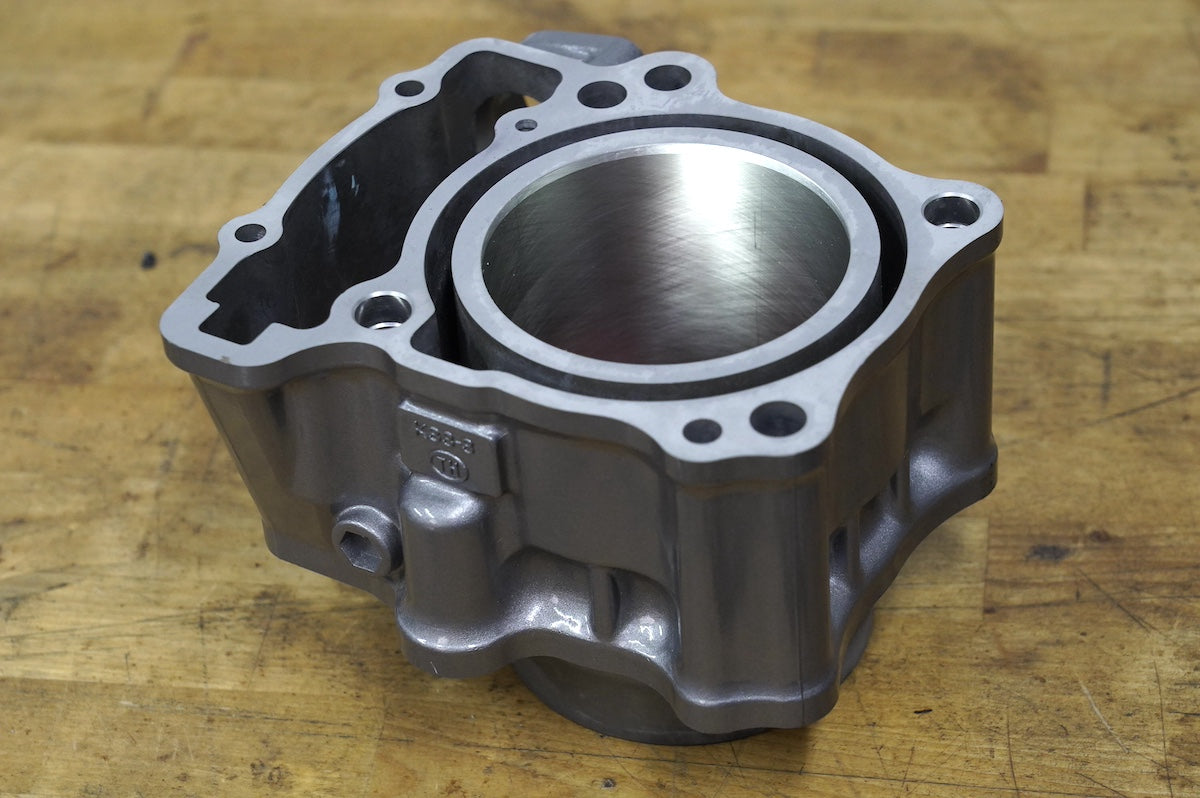
- New, OEM Honda cylinder bored to match piston
- Cometic head and base gaskets in custom thickness to optimize quench clearance
- Upgraded Class 10 stud nuts
- Click here for install tips and break-in guidelines
PLEASE NOTE: This is not a standalone mod! You must run the full Stage 3.0 parts package which includes:
1. 301cc piston and cylinder set
2. CBR300R camshafts
3. Stage 3.0 ECU tune
4. Hi-flow no-cut velocity stack
5. Twin Air hi-flow air filter
6. Hi-flow airbox lid
7. Snorkel removal
8. Performance exhaust - Yoshimura or Graves highly recommended
We can facilitate everything you need to bring your CRF300L or Rally from bone stock to Stage 3.0 or 3.5. Drop us a message to have us custom-build a shopping cart for you.
91 octane (R+M)/2 (95 RON) gas is required. This kit should be installed by a professional mechanic or someone of similar experience following steps outlined in a service manual.
Warning: This product is for closed-course competition use only and is not intended for street use or use on public lands. This product is not legal for sale or use in California.
Share
First off, many thanks to Ari for all the remote assistance! He was great to tutor a “not ready for prime time mechanic!” I learned a lot.
Be sure to read all the documents fully before starting. And watch his video. Also get a good manual!
1. I was able to not have to disconnect the air box from the throttle body, I used a cam strap to pull it to the rear which gave me enough room for the head to pass by.
2. Use a “magnet on a stick” to retrieve the head nuts and washers. Stuff a rag or paper towel in the cam chain tunnel so nothing drops down there.
3. Be sure to closely inspect the case where the stock cylinder sat, we missed a small piece of gasket that had broken off, requiring a round 2..the photo below shows where it was, just in front of the coolant channel.
4. Getting the rod connected to the 301 piston while it is inside the cylinder is not to tough. I used a 1/4” long extension with a 8mm socket to help the pin through. The wrist pin can be a challenge so practice on the stock one you removed to practice working it into where it sits. I used a small flat head (not micro small) to work it in.
5. The forward cam chain guide is a bit tricky, Ari has instructions. The trick is to get it to sit into the slots in the head, so look at the head carefully and understand what has to happen.
6. When placing the head nuts/washers I used a couple tricks a friend showed me. Place a piece of electrical tape inside the 14mm deep well socket, make sure it’s secure so it doesn’t fall off in the head. This holds the nut to the socket. Next apply a bit of grease to “stick” the washer to the nut. This works really well.
7. After torquing the head nuts. Place the 2 long bolts back into the cam chain tunnel. I broke one of these, requiring round 3. In the photo you’ll see that it’s best to use a 1/4” drive socket rather than a 3/8”. The 3/8” pushed the bolt head out enough that it damaged the threads causing the bolt to break, luckily it was in only finger tight!
8. Be careful when using a screw gun to put the body bolts back in. I got one in a bit off center and love those headaches.
Print out Ari’s instructions and have a hard copy of the workshop manual.
Lastly, I will remind everyone just how hard it is to get general nuts and bolts for a motorcycle these days, gone are the days of going to the shop and having bins of them. So take your time and have a system for accounting for which bolt/nut came from where.
What a great kit for myCRF300L . You get a brand new cylinder that's already bored and honed. Along with a beautiful J E high compression piston and ring set that ARI pre gaps for you. All that along with the Cometic head and base gaskets. ARI's installation instructions make it simple put together and follow his recommendations for the proper break in and you will have a bike that will provide miles and miles of fun and durability that will last for years. Along with my kit, I also bought the CNC ported head with the Black Diamond valves and light weight springs and retainers. What a beautiful work or art it is. My bike is now set up in the 3.5 Tune mode and I have the 550 Performance ECU along with the airbox mod and snorkel. This thing runs hard and is a big improvement over stock. I highly recommend this kit to anyone who owns a CRF300l.
2025 Rally with everything Ari offers, except the ported head.... I may end up doing the ported head also....
Did big bore, intake, valve train, chip, Graves exhaust (blue) looks great, and the -40 mm Rally Raid suspension with rear remote. I am Loving this bike. Does anything I ask it to do. Im no motorX stud but can ride just about anything and these upgrades have just enhanced that about the bike
Ari is professional, thorough and just a pleasure to do business with. He explains the process and even how and what to expect from the upgrades. I am an attention to detail kind of guy and Ari met all my expectations, Thank you!!!
Ari is fantastic to deal with!!! Super helpful and full of advice and knowledge. Went above and beyond to understand my needs. Shipping and purchase was better than expected to the other side of the world.
Totally recommend Ari.
Thank you so much.
Ari was fantastic through the whole process was quick to reply to emails and answer your questions without hesitation. He even referred me to a really good mechanic in my area that could do the build for me! I could not be happier with the product or the service you will not regret doing business with him!